
+44 (0) 845 68 015 68+44 (0) 1332 419 999
Mon-Fri 8.00 - 5.30Sat-Sun Email support


(Main image credit: unsplash.com)
Do you use Tik Tok?
There’s a good chance you do, as statistics show that 13 million of us in the UK used the app in 2021 alone. Not to mention the reported 1 billion users worldwide.
However, you might not know that apart from being the fastest growing social media platform of all-time, Tik Tok has recently expanded their services into the advertising market.
Tik Tok started beta testing an advertising platform in early 2019, slowly introducing its users to the potential to engage with hundreds of millions of people worldwide.
Fast forward to June of 2022; you can now setup adverts to target audiences based on several metrics, ranging from topics of videos they watch, their age or gender, how they interact with videos, even down to the device they’re using to watch videos. Crazy.
So how can we profit from this as affiliates? We checked it out ourselves and have broken it all down for you. Read on to find out.
Setting Up the Platform
First thing you need, is a Tik Tok account. So just in case you are one of the few, not the many, sign up here – https://www.tiktok.com
Next, you need to create a business centre account. This is where you manage all your adverts, and advertiser accounts. Set this up here – https://business.tiktok.com
It’s a big platform so we can’t walk you through the entire setup, but it is very intuitive and essentially a ‘next, next, next’ setup, with you filling in your account details along the way.
Here is the official TikTok help centre – https://bit.ly/3ss0ymw
Once you have added a balance to one of your accounts, you are ready to create and submit your first advert.
All you need now, is an offer to run! If you aren’t already, sign up to Monetise here to get access to our growing list of owned, exclusive, and direct offers, plus many more.

(Image credit: unsplash.com)
How To Create Tik Tok Ads
TikTok provide different methods of displaying ads, each with their own uses and end goals in mind. Below is an image taken from the business centre that shows the types of ads you can create. We are going to focus on ‘Traffic’ in this article, although we have briefly touched on a couple of others below.
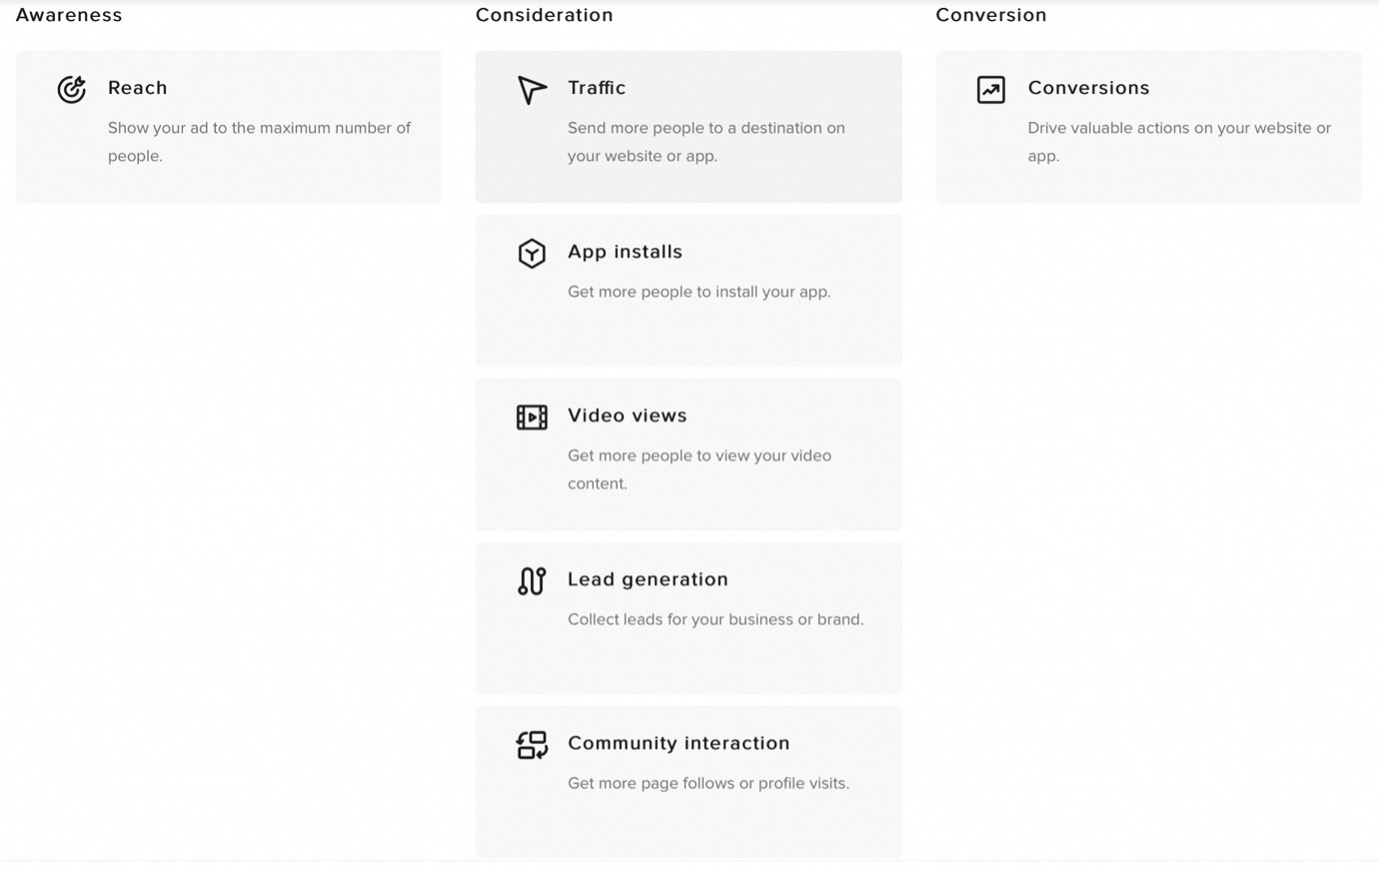
Reach
The most basic of all the ads; the goal here is to get TikTok to simply show your advert to as many people as possible. This is useful if you are just trying to create brand awareness or create a viral video.
Traffic
Moving into the ‘consideration’ field, this type of advert lets you put a CTA in place to try to get users to click onto your destination URL. This is great for lead gen, as you can put your affiliate link in here and it will take the user to the destination landing page of the offer you’re promoting.
Lead Generation
You’d be forgiven for thinking that a lead generation network, such as us at Monetise, would advise you to use this type of ad on TikTok. However, it doesn’t quite work like that.
This ad allows you to create a lead capture form that will pop up on your TikTok ad. Normally, you will be using an affiliate link to direct the user to the advertiser’s landing page, to directly put the information in there. For that reason, we don’t recommend starting with this type of ad. Although, it is possible to integrate it to a landing page using API. That’s outside the scope of this article.
Conversions
Again, more forgiveness on offer here. Look inside your Monetise portal and you’ll see ‘Conversions’ written in the reports. Generally, you want to get some of those!
In this case though, your objective is to get a user to complete an action on your website. This could be adding something to the cart, or registering an account etc. It’s all tracked by a TikTok pixel that you install on your site.
You can only do this if you own the website. As otherwise you can’t place the pixel and track the leads.

(Image credit: unsplash.com)
Campaign Details + Budget
Once you have chosen your ad type, give the campaign a name to identify it in your reports, and choose your budget. You’ll see the screen below.

If you plan to try different adverts under one campaign, the split test can be useful. It will allow you to send a percentage of traffic to each campaign, so you can identify which one works best.
Generally, we recommend keeping campaign budget optimization off. If you want to know the nitty gritty of how it works, check out the help centre.
Finally, set your budget. We set ours as ‘No Limit’, as you can set individual budgets on each advert. If you wish to set your budget at the top level instead, do it here. The minimum is £50 per campaign per day, or £20 per advert per day.
Ad Groups
Next up is ad groups. These sit underneath campaigns and are used to control multiple adverts under one roof. For example, if you wanted to target the same audience, but with different creatives, you could put both ads under the one ad group.
To start, give your Ad Group a name. Again, it’s just for your reporting. Select your promotion type, in our case it’s going to be website. Then, you’ll select where to display the ad.

TikTok also use the News Feed and Pangle apps to display their ads. We have only ever used TikTok and usually untick the other two, but if you want to experiment, that’s up to you.
Keep on the User Comment field, but you can turn off Video Download if you don’t want people to rip your content. Keep automatic creative optimisation off, as you’ll do that yourselves after you analyse your reporting.

(Image credit: unsplash.com)
Audience Targeting
Now the fun part. This is where you fine-tune who is going to see your adverts.
Sure, if you’re running our popular Simply Cook offer, you can start by targeting people who are interested in cooking, or food videos.
But what if you are trying to generate leads for a health insurance campaign, who might you target there?
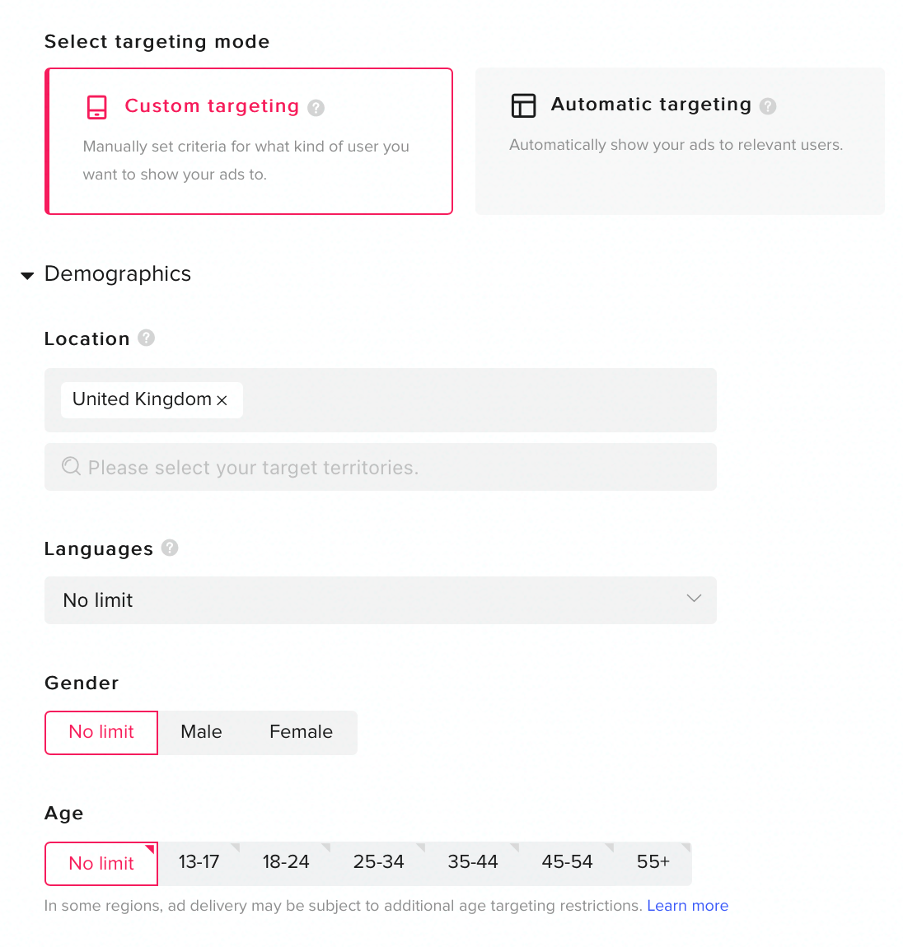
First off, avoid automatic targeting to give yourself the best chance of achieving conversions. If you’re using the Reach ad type, it’s not so bad. If you are using Traffic to generate leads, it’s better to aim your advert at people you know will be interested rather than letting TikTok spend your money to figure it out for you.
Demographic is straight forward, just pick the destinations and languages that are applicable. A lot of our offers are UK only for example, so it would be a good idea to pick United Kingdom + English. Initially it’s always good to include Male and Female, but when you see the reporting, you can drill down to either gender if you notice one outperforms the other.
This also applies to age, though it’s good to initially have the option to choose which ages to target. Some offers only allow traffic from users over the age of 55. Additionally, if you’re advertising something like an investment service, you typically wouldn’t want to target ages 13-17.
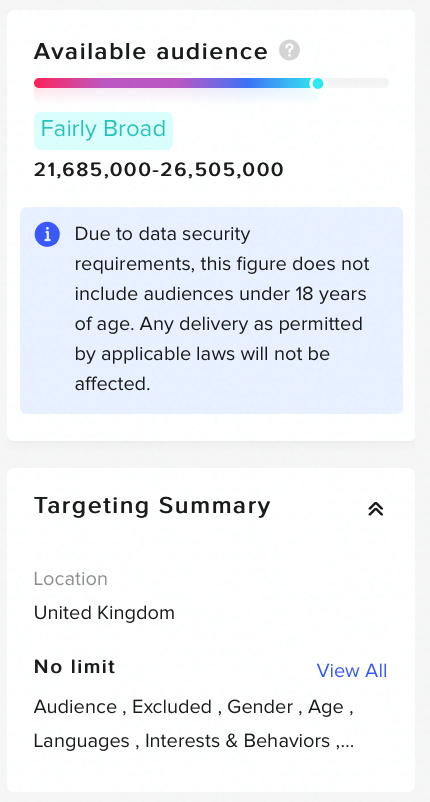
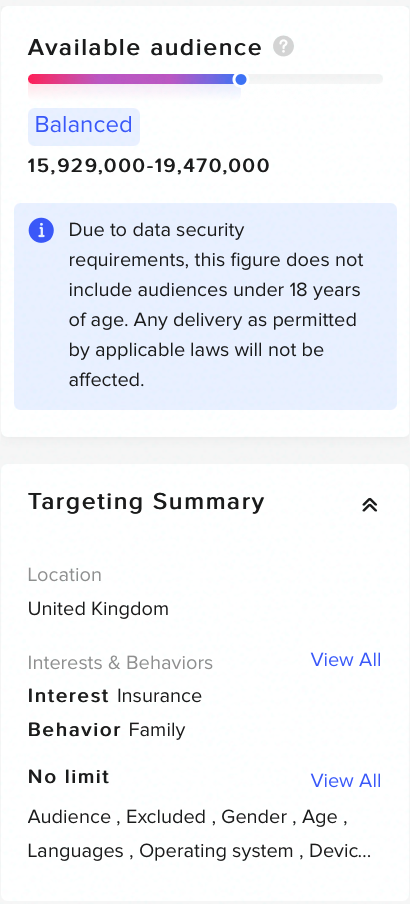
At this point, look at the audience summary that shows you how many people will see your ad.
Targeting By Interest
Now that you have picked the general demographics to target, you can further refine your target audience. This is where the success of your campaigns is going to lie.
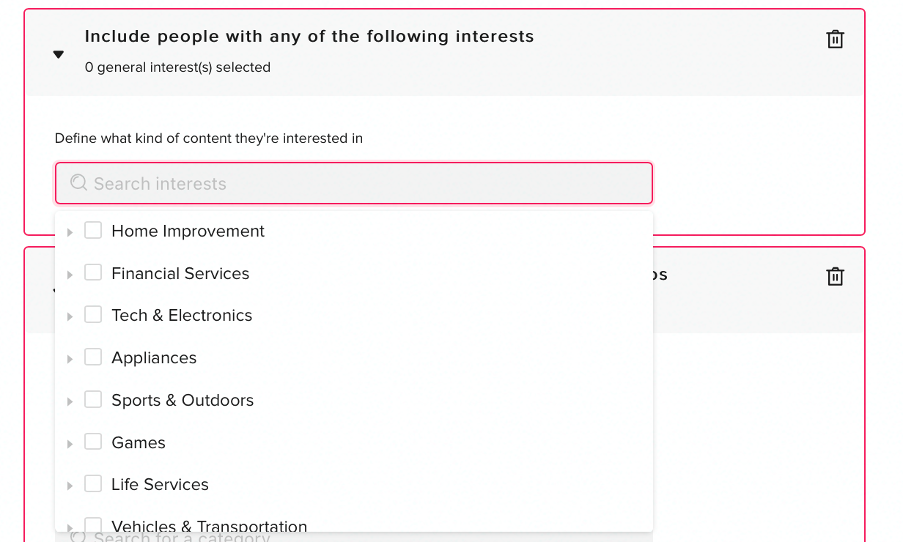
Here you can choose to target people who have shown an interest (i.e., liked posts, followed channels, searched for) in certain categories. Each category has sub-categories so you can target further, for example:
If I am promoting an insurance campaign, it may make sense to target people who have engaged with in Financial Service products, so I click into that category.

We see that we can choose to target Financial Services as a whole or choose one of the above sub-categories. Logic dictates that we’d be better targeting those who have shown an interest in Insurance, over those interested in Foreign Exchange Transactions.
You can select as many categories as you want, and any users who fall into any of those categories will be targeted. Bear in mind, the user just has to express an interest in one of the categories, not all of them.
Targeting By Behaviours
Additionally, you can choose to target by the user’s interactions with videos. Going back to our Life Insurance example, I think a good starting point would be to target people who have either liked, or watched all the way through, videos about relationships and families.
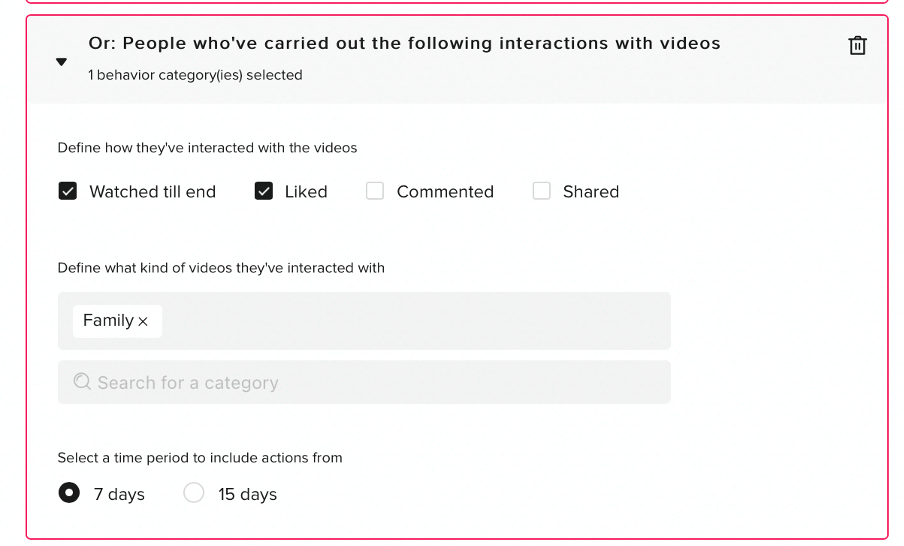
It would seem that these users would be more likely to consider a Life Insurance policy, than somebody who was just interested in drawing, for example.
Targeting By Creator Interaction
Another way of targeting; you can choose to find users who have followed or view the profile of video creators of a certain topic, i.e., Family.
Targeting By Hashtag Interaction
Finally, as the title suggests, you can choose to find users that interact with certain hashtags. This is a good way to drill down if there is a very popular hashtag within the vertical that you’re targeting. For example, let’s say that #lifeinsurance is a popular hashtag, it would serve you well to target users who have searched for that, or liked videos with it on.

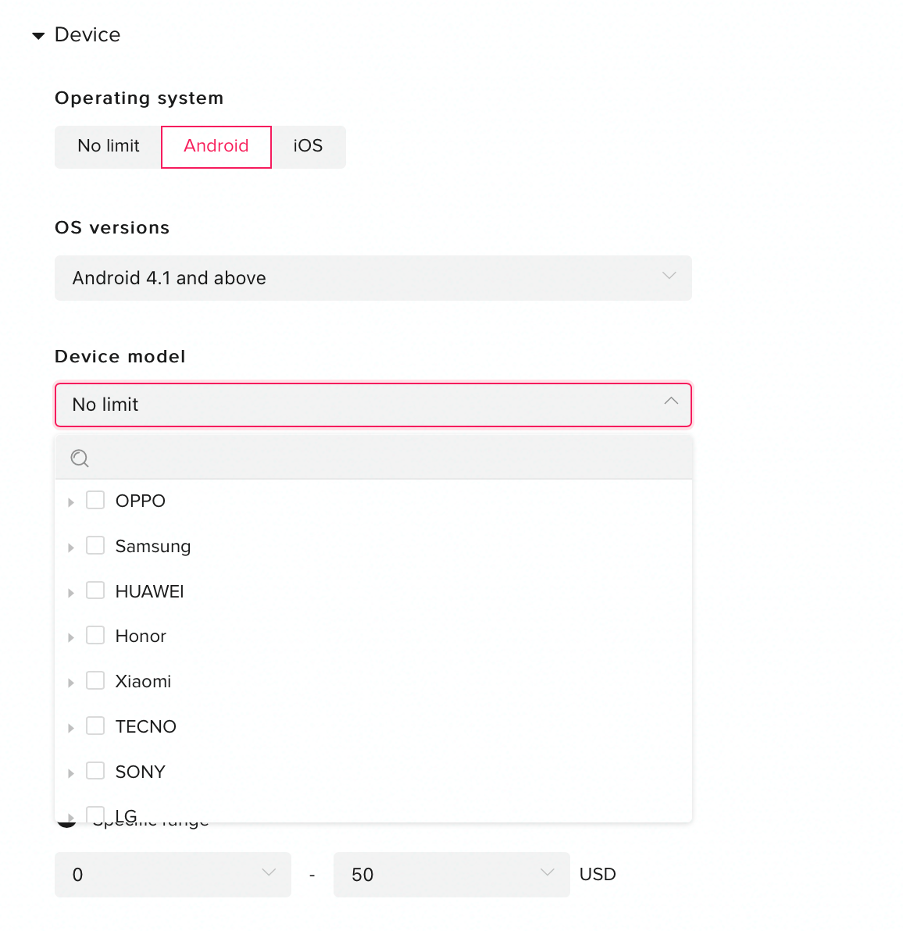
Targeting By Device
You can even drill down to the specific devices that people are using. I mean, literally the operating system version, or the specific model of device they are using.
Furthermore, you can decide to target users whose phones are worth a certain amount of value. Not sure why you’d want this, but it’s cool none the less. I’m sure someone is using it to good effect.
Audience Summary
Now that you’ve selected all your audiences, see how the audience summary has changed. It should have narrowed at least a bit, and you need to play around to find the sweet spot. You generally don’t want it so broad that there is basically no targeting, but also not so narrow that the user pool is too low.
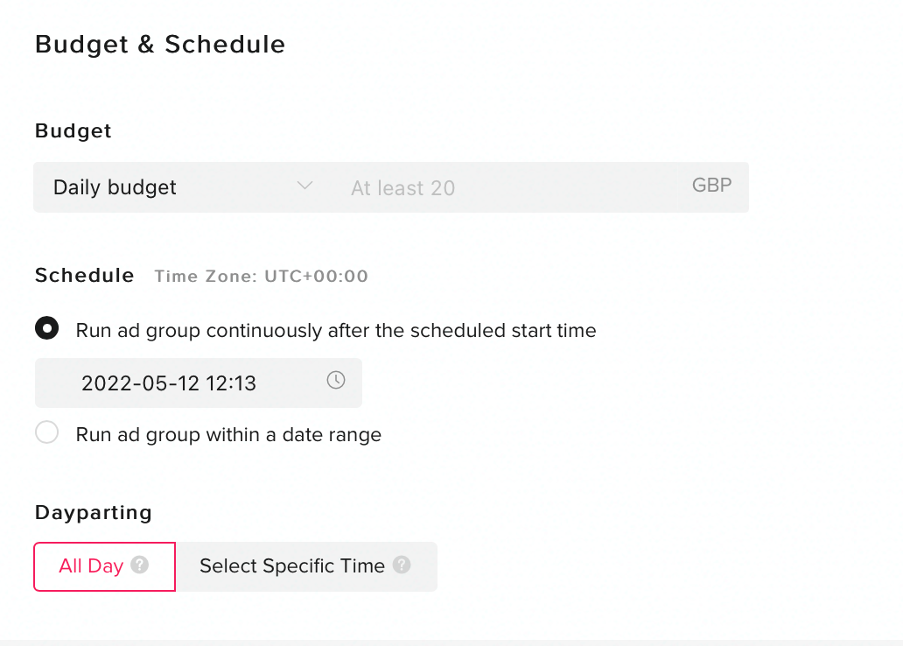
Daily Budget and Bidding
Last two things to setup are the budget you want to allocate to the ad group, and what bid strategy you want to use.
You must set a daily budget so that TikTok knows how much to push your advert. You can start with as little as £20 a day and see results. Of course, the more you invest, the more users will see your ad.
Next you select the start time, we just set ours to run straight from the start time. As soon as your ad is approved, it will start sending out. If you want to set it up in advance, you can do that with the ‘date range’ setting.
With regards to bidding, there are two strategies available:
For a more detailed breakdown of the advantages of each bidding strategy, see here: https://bit.ly/3MbaM2o
Creating Your Ad
With all the configuration out of the way, it’s finally time for you to create and upload your ad (if you haven’t by now).
Some people like to just stand in front of the camera and say their pitch. Some like to hire freelancers off Fiverr.com to create a professional pitch for them. Others like to just use voiceover tools online and screen record their phones.
The creativity is your decision, and you can go anywhere you want with it, just follow our best practices to ensure you’re on the right tracks:
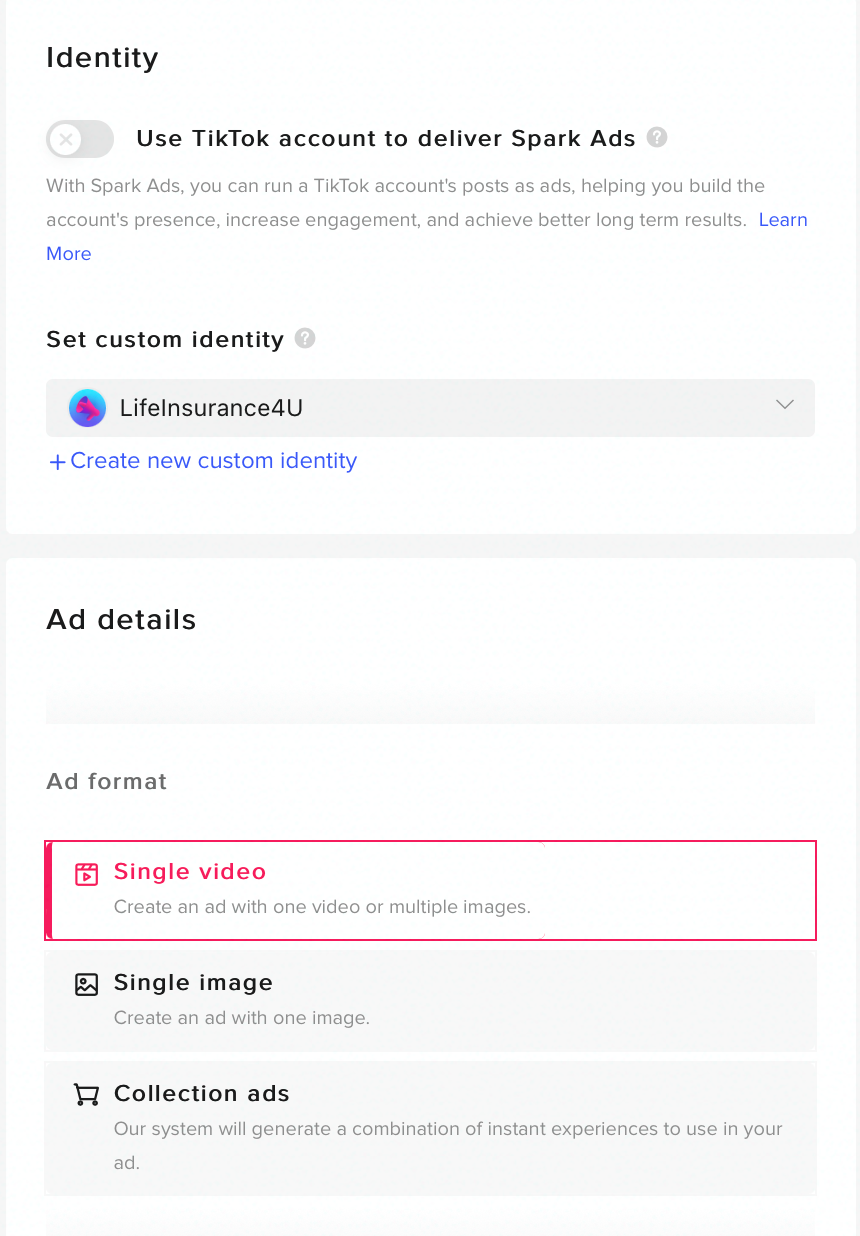
Once uploaded, create your identity. This will be what shows up in the bottom left corner of the ad, as the account name. Just like if you uploaded a personal TikTok, it identifies you. You can call it what you want, but it should be something related to your service. See that we chose LifeInsurance4U, for mock our Life Insurance ad.
Setting Up Tracking
Next field is important, if you want to be paid for the leads you generate, you better get your tracking right!
Fortunately, they’ve made it easy. Just stick your tracking link in the destination URL section, and then select your CTA method.
You can use dynamic, which will split between a bunch of different CTA names like:
You can pick the ones you want to use, or just set a static one to have that display all the time.
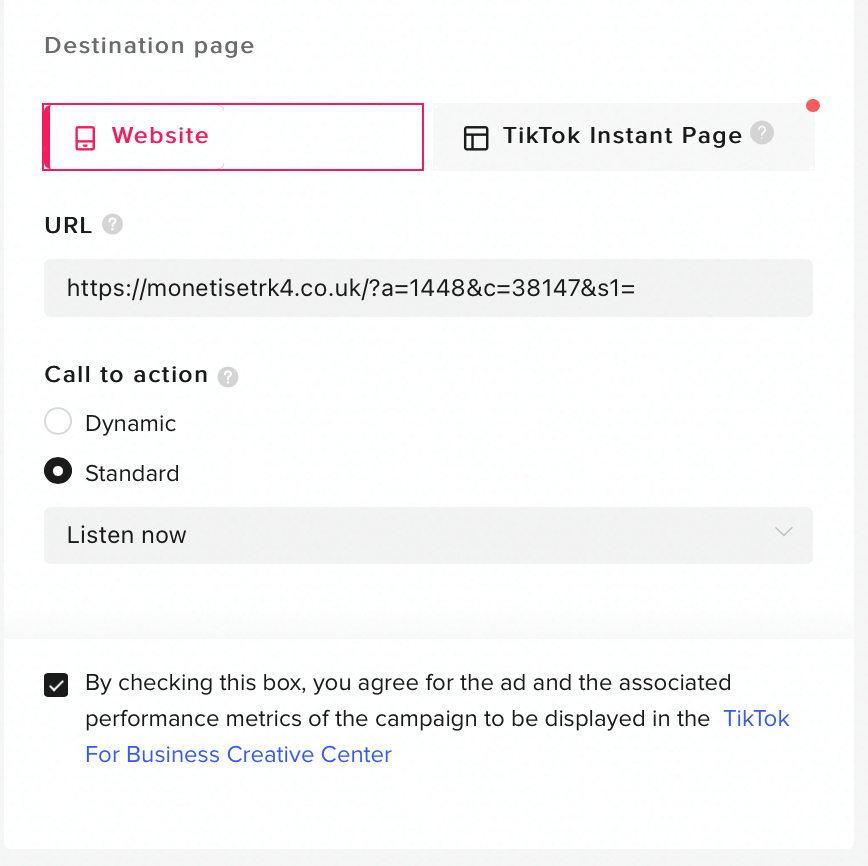
Also, check that box at the bottom. It means it’ll display your ads in the creatives centre which means people looking in there will see it for free. Free clicks are good clicks.
Submitting Your Ad
Last thing to mention is the tracking pixels. You probably won’t have any, but just in case you do have any TikTok tracking pixels that you’ve implemented on your website, stick them in the fields below.
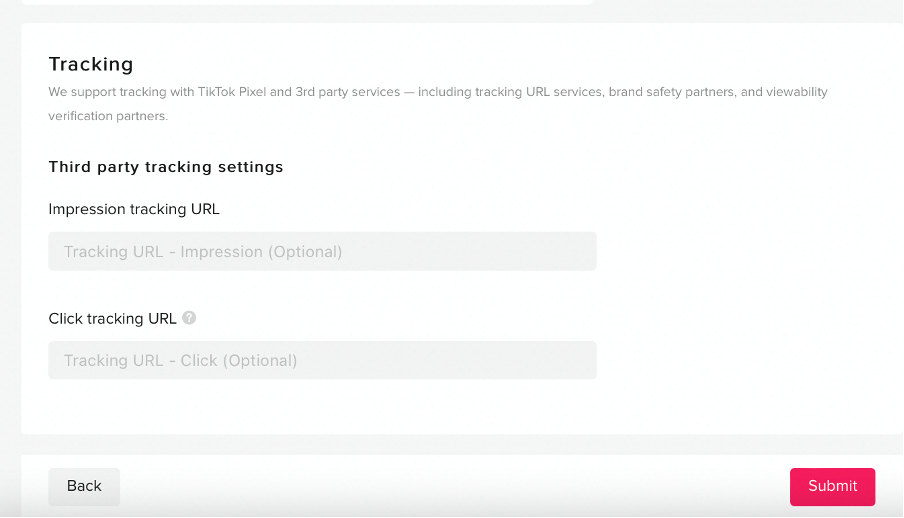
Then just press Submit!
TikTok will create your ad, and it will go up for review. You’ll then be sent to the campaigns page where you’ll see the status of the advert.
It will say ‘Not Delivering: Ad under review’ to begin with, before turning to ‘Active’.
Once this happens, you’ll notice your spend increasing and see metrics on your clicks.

You can alter the columns you see to only show data you are interested in, and once you have started getting some traffic, you can review and optimise using the reporting tab!
That’s all for now though, we’ll cover the reporting in the next post.
Thanks for reading.